Please note: 365 email users do not need to follow the below steps in order to brand their outgoing email; rather our support personnel can setup your 365 organization to route your outbound email via our branding servers using the centralised 365 interface. This makes management of outbound email much more simple.
Databias’ email branding system works seamlessly across all mail clients. In order to activate it, we simply route your outbound mail through our servers by liaising with your IT guy. However, if you don’t have an IT guy, this article may help with getting set up. Remember that you only need to brand your outgoing email, so nothing needs to change on your incoming server; all you need to do is route your outbound (SMTP) email through our server, and to do this you need to:
Open Outlook
Click on File in the top navigation bar.
Click on Account Settings on the RHS side panel that appears.
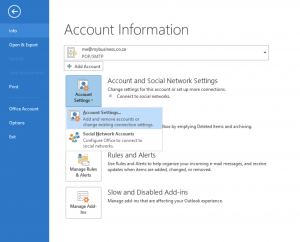
Choose the account you are working with if you have multiple accounts loaded there and then click on Change in the pop up that appears.
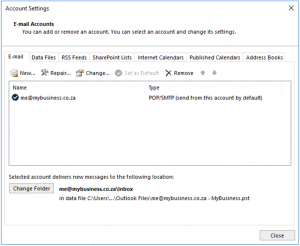
In the pop up window you will see a ‘Server information’ section. Below that information, you will see ‘Outgoing mail server (SMTP)’, which you should set to the host name that was provided by our support personel when you signed up for the branding product.
Then click on the More Settings box in the bottom RHS corner.
You will have been provided with a user name and password. And another pop up window will appear. Choose the Outbound server tab and type in your user name and password here.
And that is it with Outlook 2016 on Windows.
Good luck and remember if you do need help, mail us at support@databias.co.za and we will get right back to you.